Darkroom
My darkroom experience began in the Summer of 2001 when I took "Introduction to Black and White Photography" with Bill Kelly at the Abington Art Center. My home darkroom consists of a Paterson "Universal Tank" (two reels for 35mm) acquired thanks to the generosity of my friend Jim Flach, a couple of Jobo 1000ml graduates, and, of course, the chemicals required for developing (see below). Thus I was able to develop my own film, but still had to use the Art Center's darkroom for printing. In late 2002, however, my wife Anne decided that we should give ourselves a Christmas present of a home darkroom. Anne enjoys taking black-and-white pictures as well, and we are both frustrated by the awful quality of black-and-white machine prints (at least from all the camera stores we've tried). We wanted a convenient way to be able to do our own high-quality printing. So around November, I began researching darkroom equipment and haunting eBay. I've added some rambling thoughts about the equipment I'll need to set up my darkoom.
Kodak offers a complete online class in Darkroom Techniques that I'll be taking a look at. The Ansel Adams Guide: Book 1: Basic Techniques of Photography by John Schaefer is the most complete guide to black-and-white photography I've seen. Trouble is, I can't find my copy...
Enlargers
The cornerstone of a darkroom is its enlarger. This is not the place to skimp, although, of course, I only had a modest budget to work with, so I had some tough decisions to make. The only enlarger I have ever used is the Beseler 67. Even without comparing it to other models, I knew I wanted something better. I can't say this enlarger held me back, but it was often frustrating to use. The fine-focus knob was very stiff and difficult to turn smoothly. The lens had enough play in it that grazing it when changing filters or changing the aperture temporarily would throw the focus out. Another problem was that the focus seemed to shift all by itself, so I would have to check it before every exposure. In sum, I was looking for something a little sturdier.
I visited my usual haunts for recommendations, although I have to say that photographyreview.com's enlarger reviews, while helpful, are far from being either representative or comprehensive. In contrast to other product categories on the Photography Review site, very few people have written reviews of their enlargers.
At this time I am shooting 35mm negatives only, so I could limit my choices to enlargers that only handle 35mm. The problem is that such enlargers are usually the flimsiest in a manufacturer's product line. There are some exceptions, and I considered two such enlargers, both made by Leitz: the Focomat 1c and the Focomat V35. I'm sure either one would have given me superb prints from 35mm (the V35 is probably the finest enlarger available for 35mm), but both are rather expensive and, of course, limited to 35mm.
I looked at Durst (see their web site and click on “Darkroom Equipment” to get a menu of their current enlargers) and Saunders enlargers, but in the end narrowed my choices down to two: The Beseler 23c and Omega D2V. Both enlargers have been (or were) in production for long periods of time and parts are widely available. The 23c is still made, and the latest version is the 23c-III. This model is (or was) available in two versions: a standard column height as well as an extra-tall "XL" model. I was primarily interested in the latest XL model, although these are not plentiful on the used market. The Omega D2V is no longer manufactured, and it too is also available in regular and extra-tall heights. Of the two enlargers, I was leaning toward the Omega. For one thing, the Omega is a 4 x 5 enlarger, while the Beseler is limited to medium-format (up to 6 x 9 cm). Another plus for the Omega was the web site Classic Enlargers, which is devoted to Omega enlargers. Here you can buy any part for an Omega enlarger or even an entire enlarger, and Harry Taylor, who runs the site, is willing to answer any and all questions. It's a great resource. By the way, if you're looking for current Omega enlargers, visit their web site and click on the product range you're interested in.
I bid on two Omega D2Vs on eBay in the last month and won the second one--a D2VXL that includes a Schneider Componon 80mm f/5.6 lens. It's not the greatest lens, but it should get me started. I should be able to use that for 35mm. We'll see.
Darkroom Timers and Exposure Meters
I waste a lot of paper making test strips, like a lot of people, I suppose. I have always longed for a better way to zero in on the proper exposure and paper grade than the hit-or-miss methods I've been using. I thought there must be some kind of exposure meter for enlargers.
It turns out there are a number of meters that will do the job. There are inexpensive meters from Jobo, Ilford and other companies that will meter the light from an enlarger. There are two other systems that promise much more than that. One is the Heiland Splitgrade system. You can read all about it on the manufacturer's web site or the American distributor's web site. Another company makes a similar range of products, RH Designs. These are both fascinating products that I will be seriously considering in the future. For now, I'm going to try it without a meter or even a timer. Did I mention I'm on a budget? :-)
Trays and Washing
I decided to buy new trays because they are inexpensive and less likely to be contaminated. I'm sure most brands are fine, but I chose Cesco. The only trays in the school lab I've had any problems with were Paterson (I think; I'll have to check). To use 8 x 10 paper, I'll need four trays for developer, stop bath, fixer, and hypo clear, and another tray for washing.
For washing, I'll use Kodak Hypo Clear then rinse in a tray. An archival washer is too espensive for now. The Versalab washer is most often recommended, and the only washer to avoid is the original Zone VI washer, which is no longer available. Kodak's HT-2 Hypo Test Kit allows you to measure the hypo content of your print to determine the minimum wash time.
Grain Focuser
Barry Thornton in his book The Edge of Darkness compared grain focusers and, even though all the grain focusers indicated different focusing points, all the prints were equally sharp. He liked the Magnasight, which checks the image not the grain, and I think the Peak is very nice (although expensive) because it allows checking the print in the corners. I'm not sure how I'm going to focus without one; eventually I think I'll have to get one of these.
Paper Developer
I originally planned on using Kodak Dektol (and even bought a packet), but I've switched my preference to Ilford PQ Universal. I have two reasons: one is that this developer uses phenidone instead of metol as the reducer, which has much lower toxicity. The other reason is that it has excellent shelf life. A partially-empty container will keep for six months. I was unable to find the storage life of Dektol. The Dektol packet lists storage life of six months, but doesn't specify storage conditions. Assuming that the conditions are a tightly-closed container, PQ has a much longer storage life. A third advantage to using PQ is simple convenience: no mixing of the powder.
Other Stuff
Indicator stop bath... safelight, tongs, antistatic brush...
Film Development Technique
In my short career shooting black-and-white, I've used a handful of film types and three developers, but no combination consistently enough to control them or really understand what they are capable of. After trying Kodak T-Max and Microdol-X, I have standardized on Kodak Xtol at 1:1 dilution. After reading Anchell & Troop's Film Developing Cookbook, my head was filled with tantalizing developers, but before I go off chasing others, I thought it would be a good idea to use just one for a while so I would have some sort of baseline to judge the others. Below is my "standard" development practice (for 135 film).
Chemistry
Developer: Kodak Xtol I chose this developer as a "standard" for a number of reasons. First, I learned from reading Anchell & Troop's Film Developing Cookbook that D-76 was considered the best "all-around" developer, providing the best compromise among grain, sharpness, and speed. At least that's how I interpreted what they wrote. I also inferred that they feel that Xtol is better than D-76 in every way. Furthermore, many photographers whose opinion I trust use Xtol. As for dilution, I settled on 1:1. Many use it at higher dilutions (most commonly at 1:3) where it acts as a high-acutance developer. For some reason, Kodak no longer recommends this dilution. My opinion at this point, is that I think using it at 1:1 makes more sense as a benchmark, because it provides the advantages of dilution (a longer development time for more consistent development), while preserving Xtol's true nature (a solvent developer).
See Covington Innovations' Xtol Unofficial Resource Page for more information on Xtol.
I mixed the powder with distilled water and stored it in brown bottles from Photographer's Formulary filled to the very brim so there is no air space. I have eight or so 4-ounce (140 ml) bottles) that I filled and put the rest in one-liter bottles. To develop a roll I simply use two of the 4-ounce bottles and add the same amount of water (almost 500ml in all). This amount provides about 250ml of full-strength chemistry (as Anchell & Troop recommend, and leaves enough of an air space in the Paterson tank for some agitation. When I run out of smaller bottles, I decant one of the liter bottles into the smaller ones. I mixed my first batch of Xtol in early January, 2002.
One concern I have about using Xtol is its reputation for sudden, catastrophic failure. The Internet is full of tales of Xtol failure where the developer works fine one day and stops working the next. People report getting virtually clear negatives with only a ghost image (or none at all). Of course, most people report using Xtol with no problems at all. Naturally I don't want to be numbered among the Xtol victims.
One variable seems to be that some Xtol sold in one-liter kits (enough powder to make one liter) was troublesome, especially when the powder was caked. Kodak has withdrawn the one-liter size from the market, and now the smallest size available is five liters, which is a year's supply for someone like myself (20 rolls). I couldn't buy the one-liter size if I wanted to, so that factor is eliminated. The only other factor is storage. Kodak suggests that Xtol should be stored no longer than six months in completely-full, tightly-sealed containers. I have complied with the airtight storage requirement, but I've been pushing the shelf life. After eight months, my first batch of Xtol is still going strong. Perhaps the six-month limit is a conservative estimate. Another possibility is that my Xtol solution has been losing some strength, but because I use so much of it (although not much more than the recommended minimum quantity of 200ml per roll), there's still enough potency to develop a roll of film. I'm not sure how Xtol will fail, gradually or all at once. Will it just underdevelop a little, stop working completely, or create some other problem? What I'm wondering is whether there is some loss of activity that creates a subtle problem. My last two rolls don't look good, although they have normal density. I did a clip test before each roll, but this would only prevent a total failure. I think I've convinced myself to toss out the last liter of Xtol and start over with a fresh batch (or find a different developer!).
I use a Paterson tank and develop only one reel at a time, using about 500ml of chemistry. With Xtol, this guarantees that there is 250ml of straight Xtol in the tank, which Anchell & Troop recommend. This amount may sound excessive, but the Kodak data sheet recommends almost the same amount. A chart on the sheet recommends developing only up to 5 rolls per liter of Xtol; any more than that, and they provide a suggested development-time increase. That implies that they recommend a minimum of 200ml of Xtol per roll (regardless of the dilution). I feel safe with 250ml. The 500ml amount does not fill the tank, thus leaving some room for the solution to move when the tank is agitated.
For agitation I invert the tank and add a simultaneous twisting motion as recommended by Anchell & Troop so that the chemistry really sloshes around. The sloshing does not concern me. I am convinced that you can't ruin your film by overagitating (other than raising the contrast a bit); I just mean you shouldn't get streaks or uneven development this way. In fact, I've read a number of opinions that recommend a vigorous "cocktail-shaker" agitation technique, so I would say it's better to err on the side of stronger agitation. I don't take any special care pouring the developer in. I try to pour it in as fast as possible. I believe the Paterson tank fills from the bottom up gradually no matter how fast you try to pour in, so I don't think it can slosh or "surge" around. I rap the tank on the sink several times after each agitation.
Stop Bath: Water I don't use any kind of stop bath other than plain water (well water filtered using a Brita pitcher). I line up five water glasses (each holds 350ml) for five changes of water. After I pour out the developer, I pour in the water from the first glass. I then agitate continuously for about fifteen seconds, pour out the water and repeat for the remaining glasses.
Fixer: Kodak Rapid Fixer I mixed a gallon and to use, I dilute it to 1:3 (according to Kodak). A gallon thus makes four gallons, which can fix about 30 rolls (at 500ml/per roll used one-shot). The fixer will be exhausted probably long before I can use it up. Before starting a session, I always test my fixer! (see below for why) I've found that the Ilford fixer loses its potency over time, so I mix it at a roughly 1:1 ratio. Film clears in about three minutes. After fixing, I rinse the excess fixer with two changes of water, each agitated for fifteen seconds.
Washing Aid: Kodak Hypo Clear I started out using Ilford's Universal Washing Aid, but ran out in May, 2002 and switched to Hypo Clear. Diluted using distilled water. I agitate for 30 seconds, then let stand for two minutes.
Final Washing After the Hypo Clear step, I run tap water in the tank for about ten minutes. Following that I soak the film in distilled water with a drop of Photo-Flow for one minute, then hang it up to dry.
Problems
I've been lucky with developing, but sometimes things go wrong...
Exhausted Fixer
This problem occurred not long after I starting using Xtol, although that is pure coincidence. I mixed my first batch (the 5-liter size) and developed three rolls of Fuji Neopan 1600 using 1:1 and 1:3 dilutions with no problems. When I used it on a roll of Delta 400, however, I ran into a problem, as you can see below. The example shows the worst three frames (2 through 4). There is similar streaking and overall cloudiness around the sprocket holes on frame 1 and the leader as well, although not as dramatic as this. The problem clears up after frame 5, and the rest of the roll is fine.
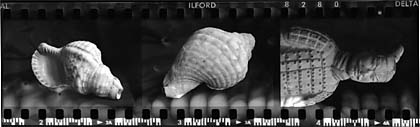
The Problem Negatives-Before. The "surge marks" around the sprocket holes made me think that the problem was insufficient agitation. Some people on rec.photo.darkroom agreed with me, while others thought the marks were caused by some kind of light leak.
Even though this was the first roll of Delta 400 I had processed in Xtol, I wasn't blaming it for the problem. I blamed insufficient agitation. I used my normal agitation schedule (60 seconds initially and then 10 seconds each minute thereafter), but I had slackened off the vigorousness of agitation. The inversions were slower and gentler, about one every two seconds, which is about half as fast as I used to do. As it turned out, that had nothing to do with the problem.
A week or so later, I felt ready to try developing another roll of Delta 400, determined to agitate a little more vigorously. Before I started, I tested my fixer, which was a 5-liter jug of Ilford Universal Fixer I bought on October 30, 2001. As a test I put a piece of undeveloped Delta 400 in the Ilford fixer. After an hour it still hadn't cleared. I suppose that storing the fixer in the original half empty container allowed it to oxidize to the point that it could no longer "fix" anything.
I got some Kodak Rapid Fixer and tested again. The test piece cleared in just a couple of minutes. I refixed the problem film, and it cleared up completely, although you can still see just a hint of the original marks on one frame.
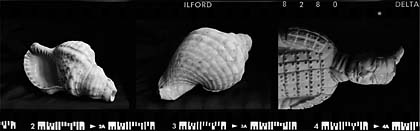
The Problem Negatives-After. Frame 3 still shows a hint of the original "surge marks," but re-fixing the film made the rest of the cloudiness disappear.
Besides the streaks, all the film from that roll had a kind of brownish tint. Re-fixing it removed the tint and now the negatives look the same as any other film. What is still mysterious to me is the sprocket-hole pattern on the film and the fact that the inner couple of loops on the reel (the beginning of the roll) were the most affected. Insufficient agitation during fixing, I guess.
Film
Negative, Black and White
I've used Tri-X, Neopan 1600, Delta 400, Delta 3200, and HP-5 Plus. I like all these films and have begun to understand (if not actually take advantage of) their unique personalities.
Kodak Tri-X was my first black-and-white film and frankly, I was disappointed. Somewhere I got the idea that using black-and-white film would turn me into Henri Cartier-Bresson or André Kertész. Even ordinary subjects would look great when shot in black and white. Right? Well, I was wrong and for a time I blamed Tri-X for what was my failure. Now I think that Tri-X, although nearly 50 years old, is still one of the great films. It has plenty of tonality; I just find the grain a little harsh or "gritty." Interestingly, I have never developed Tri-X in my current developer, Xtol 1:1, which is a "fine-grain" developer. That would be interesting.
I tried Neopan 1600 because I was looking for a high-speed film for low-light photography. Although I like Neopan very much, I wouldn't call it "high speed." I think its real speed is barely 800. I have never tried pushing it, but apparently it pushes well. It has fine tonality and relatively fine grain.
I tried Ilford's Delta 400 when I began looking for a replacement for Tri-X. I like Delta 400 a lot, but it has its own limitations. On the one hand, it has a rich, silvery look that I like, but it doesn't handle (compress) high-contrast situations very well. I tried overexposing and underdeveloping it, but this seemed to have no effect at all on the contrast. I'll use this film when I want sharpness and punch in low-contrast lighting. Incidentally, I've only used the "new" Delta 400. I haven't been using it long enough (since late 2001) to have seen the original version.
My next stop was Ilford's HP-5 Plus. This is currently my favorite film simply because I feel like I can control it. It seems to be naturally a low-contrast film, and scenes photographed in high-contrast light with N-1 development look great. It's smooth and punchy at the same time. I use normal development for low-contrast light and usually have two rolls going at once and load the camera with whatever roll is appropriate for the lighting.
Along the way I also tried Delta 3200 after reading a lot of opinions comparing it to Kodak's T-Max 3200. (I haven't tried T-Max 3200.) The data sheet claims the real speed is ISO 1000, so this is a film designed for pushing. I shot my first roll at 1200 and developed it in Xtol 1:1 for 12 minutes at 75 degrees. I was surprised at how unobtrusive the grain is. I entered some prints in an exhibition sponsored by the Abington Arts Center and one of the ones they chose is about 9 x 12 that has hardly noticeable grain (although the nature of the subject conceals the grain well). It certainly wasn't what I was led to expect from a high-speed film. I think someone could even use this film as a general-purpose film. I wonder what I would use if I wanted big grain? T-Max?
After experimenting with these films, I came to realize that what was missing from my black-and-white photography was discipline and technique. I tended to be more careless about exposure and less picky about lighting when I was using black and white film (as opposed to slide film), but that was the source of my disappointment. Since then I've made a few negatives that I am proud of.
Negative, Color
I don't have much to say about this type of film. I pretty much use only Fuji NPH 400 and like it so much that I've never been motivated to try anything else. My main application for this film is shooting people in residential interiors using flash (in other words, family and friends at home). I think it looks better overexposed a bit (a half to one stop).
Slide
I've used Fuji Astia most of the time, occasionally some Velvia and Provia 100.
Determining Film Speed
I'd like to determine the "real" speed of the black-and-white films I use, mostly because I usually underexpose. A couple of references that describe how to do this without laboratory equipment are: